£0.00


Make your own Seamless T-Shirt Yarn
I love to tread lightly on the planet and I really love using eco friendly materials in my knitting & crochet. Nothing is more sustainable than taking your own waste fabric and turning it into something new. In this blog and accompanying video tutorial I am going to show you how to make your own SEAMLESS t-shirt yarn. There are so many potential projects for t-shirt yarn from pots, containers, bags, clothes and accessories. It is a great material to use to learn to knit or learn to crochet as you can really see what you are doing and it grows really quickly. My absolute favourite thing to knit in t-shirt yarn is my range of fabric jewellery which is fun & funky, easy to be just thrown on to finish an outfit whether casual or smart. It is washable & so, so versatile as you could also use the necklaces as a hair band or a belt too. The necklaces pictured were made from manufactured t-shirt yarn but you can still get a really nice finish at home if you follow my tutorial below.

Why Seamless?
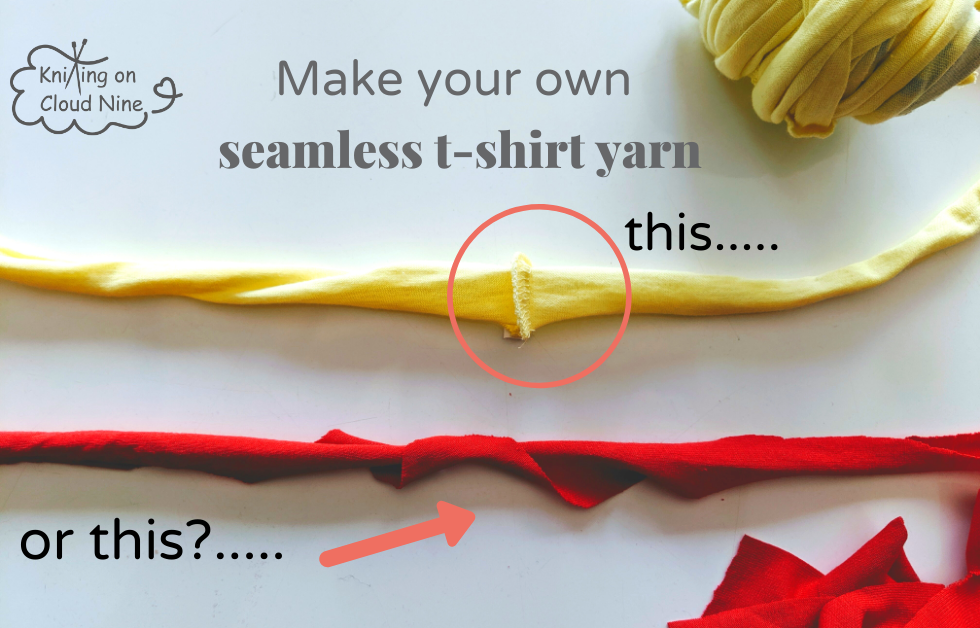
The method I use ensures “no seams”! I have tried the Youtube tutorials where the yarn is cut in a continuous spiral and this method is great if you have seamless t-shirts in your wardrobe (yes, they do exist!) but I’m sorry but I just don’t like it when every so often in my work I end up with an ugly seam popping up. I have heard folks suggest you can push them through to the reverse or embrace them! I guess it’s a personal preference. We are all looking for different effects and where it might be fine on a rustic rag rug I prefer to have options up my sleeve for different projects and so I have my own way which was born through the desire to have my work as neat as possible. It maybe takes a little longer but I think it makes such a difference to the end result. T-shirt yarn with seams in ends up, in my opinion, looking like a bit of a hybrid between these two looks. Take a look at what I mean …..


Materials for making T-shirt Yarn
So before we dive in, exactly what kind of materials can we make into yarn. Old or worn t-shirts are the obvious choice. I tend to just use t-shirts that are not good enough for charity, maybe stained or ripped or undesirable in some other way! These issues can all be cut around when we are creating the yarn. Cotton jersey is so good for yarn because it folds in on itself naturally, doesn’t fray and is stretchy and versatile. So really all cotton jersey in your home would work. I have used sheets, lycra leggings, an old kids rash vest, dressing gown etc. Non stretch fabric can also work really well too eg. denim strips which make fab rag rugs (as in picture above). Really any interesting damaged fabric could be transformed into something – just use your imagination and make your own seamless t-shirt yarn.
Make your own Seamless T-Shirt Yarn
So I use 2 methods depending on the waste fabric I am about to cut up. Here is the video tutorial on how to make your own seamless t-shirt yarn but please read the blog alongside it as the words intend to emphasise the points the video might need further explanation.
- Maze Method – named because you follow the flow of the fabric, generally cutting out a 1 inch strip, round & round in a square shape right into the middle. Like a maze or labyrynth. This method has softer “turns” but more of them as you get into the middle.
- Back & Forth method – it is best to start with a square or rectangle for this method and it is best to start cutting with the narrowest side facing you ie. you are cutting into the longest side. You start cutting a 1 inch strip up the whole length stopping 1 inch from the top of the opposite edge, you then flip the work over (or run to the other side of the table!!!), leave 2 inches from the same edge (ie. 1 inch to the 1 st strip & then 1 inch to make the second strip) and then cut right up and stop 1 inch before the opposite edge…..and so on. This method is great for long lengths of fabric and has less “turns” overall.
This wee diagram is a pictorial representation (excuse the artwork!). I haven’t drawn all the cuts (because then it would look to crowded), just enough so you can see the flow of the method. Arrows represent direction of cutting.

Once you have completed your strip you then go back through it and cut around your corners. You are just rounding them off, blending into the sides and taking away the excess material which would stick out of your work if you left them. Your strips will never be uniform in thickness and that is just a fact with t-shirt yarn. Even the commercial yarns will vary in width & thickness to a degree. These rounded corners will however blend into your work better. Here are a few pictures to help you know how to trim for each method.


Trimming in this way will mean the fabric will fold & layer rather than having a big lumpy seam. Once you have cut all your corners away then pull & stretch the whole length of yarn you have created all the way through your fingers. You are going to get a bit of fibre dust and this is unavoidable. The pulling encourages the yarn to turn in on itself to create more of a tubular shape. You can wind up into a ball as you are pretty much done.
Finishing Off
Roughly one side of an average size t-shirt, cut in 1 inch strips will give you 10m of yarn. This is pretty rough though given there are so many variables but will give you an idea. You would need both sides of the t-shirt to knit a necklace or a couple of bracelets. Remember you can use the sleeves too to ensure the least waste possible. You would need a whole t-shirt to make a house plant sized pot in the same yarn too but these crochet pots look great in random stripes thus using up all your waste. To join your strips together I tend to join just as I would do in knitting or crochet, leaving a short tail at the back of my work, then starting to work with the new strip and leaving another small tail at the back of my work again. When I am finished I then trim these tails into a point (ie. make them thinner and less bulky) and then weave them into the back of my work as I would any other join. Another way that works well, is to overlap the strips by about an inch, then simply sew, using a few stitches one on top of another in thread the same colour as the yarn. This is pretty invisible too.
Projects to Try
If you do have a go at making your own seamless t-shirt yarn then take a look at all the chunky, eco jewellery options then check out the 4 design pattern booklet that is downloadable or a physical version can be posted to you, if you prefer. These are very easy and all knitted. You could teach yourself to knit using the instructional videos on my Youtube channel to make these projects. It is definitely a great step to eco living & slow fashion by making your own accessories from waste. These projects are so much fun to make and to wear you will want lots of colour options, I guarantee!
Also there is a free cuff bracelet design tutorial which only takes around 10m of t-shirt yarn to try out your new skills. Enjoy folks.
Thanks for sharing your two methods of making the yarn. I think both methods would work especially well if your fabric has little or no stretch and would be great for the projects in your first picture. However the traditional method goes along with the stretch of the fabric, even if there are seams which can be tucked into the stitches, creating a true stretchy T-shirt yarn. To each his own I guess…your projects look great.
Thanks for your comments Sandy, I get what you mean. Yes you are right we are all unique and so will have individual preferences depending on what we are making. It’s good to have options to try though and I still hate those pesky seams! lol! Enjoy your crafting. xx